User Guide
WaypointGuru is a route and trip planner built around an interactive waypoint list and map. You can create standalone routes from scratch, combine routes into multi-day trips, refine them visually, save them to your account, and export GPX files for navigation apps and GPS devices.
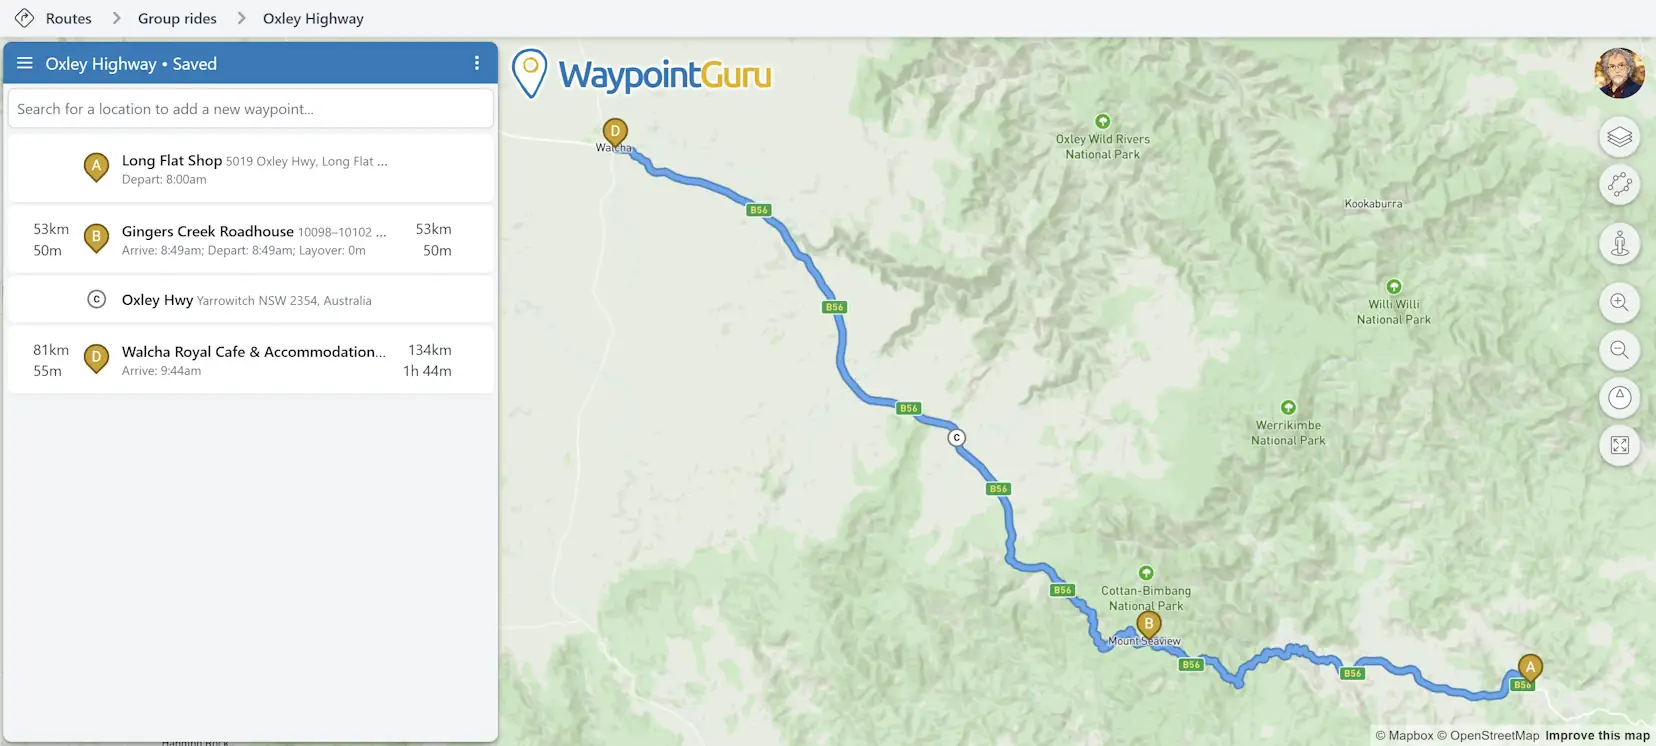
How the planner is laid out
The main screen is where most route planning happens.
- When you are signed in, the breadcrumb bar across the top shows your current folder location.
- On the left is the waypoint list for the current route, or the day list when a trip is open.
- At the top of the list is the current route or trip name, the main menu button, and the document actions button.
- To the right of the waypoint list is the map, which shows your route and lets you edit it directly.
- A vertical toolbar is overlaid on the right side of the map, with your account button and map controls.
Via points  are places you intend
to stop, start from, or finish at. Shaping points
are places you intend
to stop, start from, or finish at. Shaping points  are used to guide the route without being treated as
stops.
are used to guide the route without being treated as
stops.
For each via point after the start, the waypoint list shows the distance and riding time from the previous via point. On the right side of the same row, it also shows accumulated distance and accumulated time for the whole route up to that point. Accumulated time includes layovers.
Creating a route
Add waypoints from the search box
Use the search field at the top of the waypoint list to find a location and add it to the route.
Add via points from the map
You can also click anywhere on the map to open a popup with options for that location.
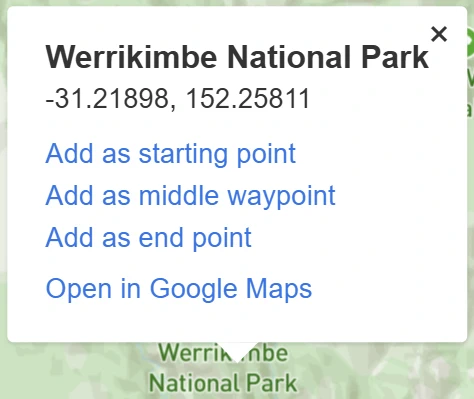
Depending on how many waypoints are already in the route, the popup can offer:
Add as start pointAdd as intermediate waypointAdd as end point
When you add a middle point, WaypointGuru chooses the best position in the route automatically.
Import from GPX
Open the main menu and choose Import routes or tracks... to load routes or tracks from a GPX or ZIP file. For details about what can
be imported on each subscription level, see Importing from GPX.
Planning trips
Use trips for multi-day journeys. A trip contains ordered route days, and one day is active and editable at a time.
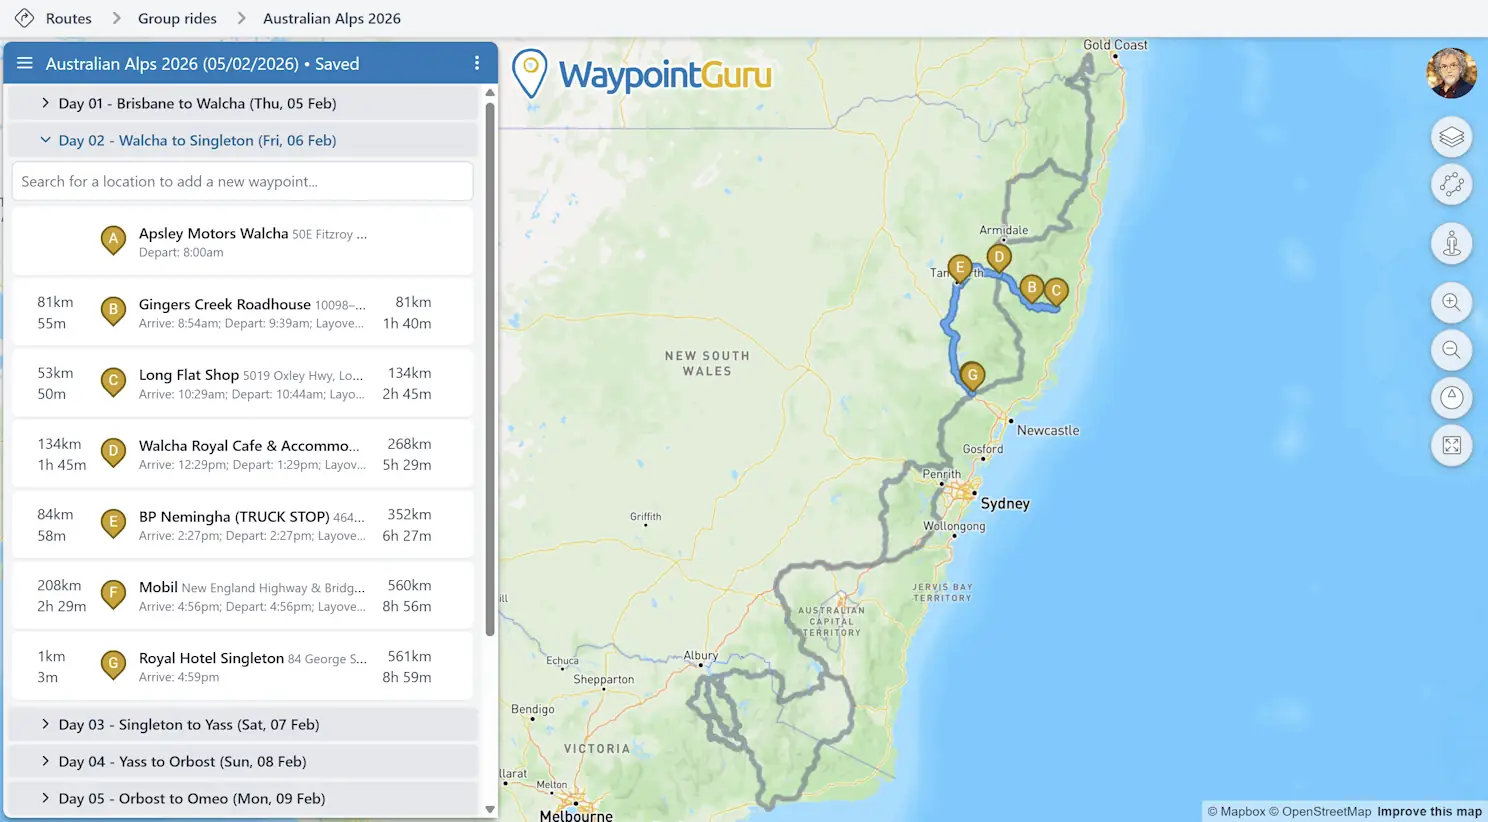
Create a trip from the main menu or Route Manager. A new trip starts with one empty day route. From the trip actions menu, you can add more days, edit trip properties, copy the trip link, export the whole trip, or close the trip.
Each trip day has its own three-dot action menu for day-specific actions such as renaming the day, copying a day link, exporting that day to GPX, opening that day in Google Maps, or deleting the day.
For full details, see Trips.
Editing the route
Edit from the waypoint list
The waypoint list is the fastest way to refine the structure of the route.
- Click a waypoint icon to switch between a via point and a shaping point.
- Drag waypoints up or down to reorder them.
- Click a waypoint description to search for a different location.
- Click the time field to change the departure time for the first waypoint or the layover time for a via point.
- Hover over a waypoint and use the three-dot menu to delete it or open it in Google Maps.
- Hover between waypoints to use the curvy route control for that segment.
The first and last waypoints are always via points.
Edit directly on the map
The map is not just a preview. You can edit the route directly from it.
- Drag any waypoint on the map to move it.
- Drag anywhere on the route to add a shaping point.
- Click anywhere on the map to add a new via point or open that location in Google Maps.
- Pan and zoom the map normally.
- Tilt and rotate the map with the right mouse button.
Undo and redo
Use your browser's Back and Forward actions to undo or redo route edits.
Map controls
The toolbar on the right side of the planner provides quick access to map features.
- Click your account avatar to sign in, create an account, or view your account if you are already signed in.
- Choose a map style.
- Show compared routes to see read-only alternatives from providers such as HERE and TomTom.
- Open Google Street View.
- Zoom in or out.
- Restore the map to its normal north-up, untilted view.
- Zoom the map to fit the full route.
Document actions and saved items
If you are signed in, you can save routes and trips to your account. Once a route is saved, any further changes are saved automatically. Trip changes are also saved immediately.
The three-dot document actions button sits beside the route or trip name and gives quick access to actions for the current document. New route and New trip are in the main menu.
For standalone routes, the route actions menu includes saving, properties, route links, snapshot links, GPX export, Google Maps, reverse, clear all waypoints, and close.
For trips, the trip actions menu includes properties, add day, copy trip link, whole-trip GPX export, and close.
For more detail, see Menus and Document Actions.
Main menu
Use the main menu button  beside the route or trip name to create or open documents and access the rest of WaypointGuru.
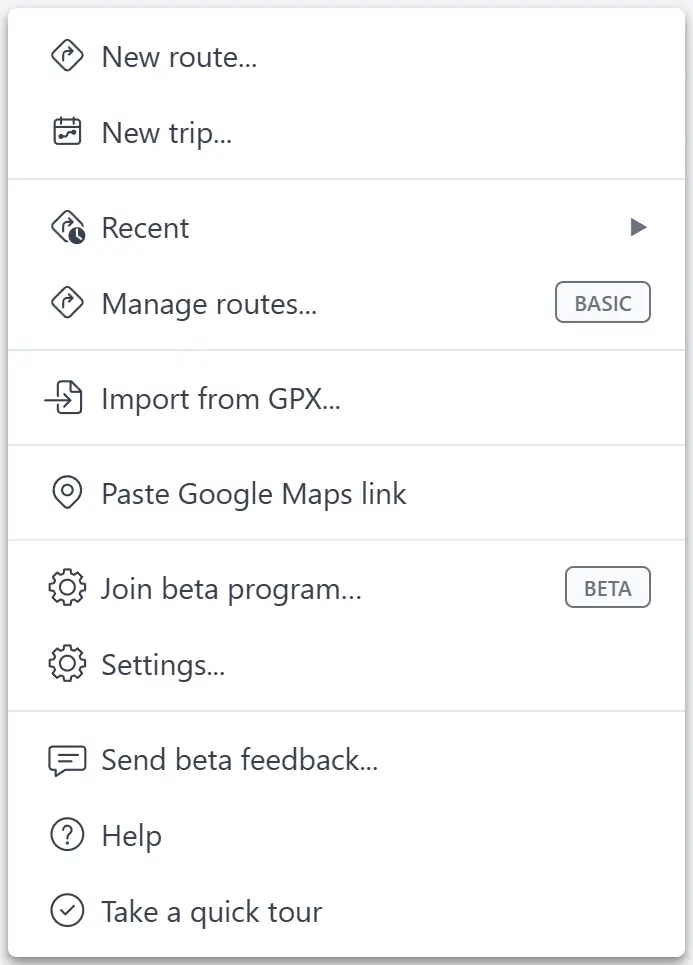
The menu includes options for:
- Creating a new route or trip
- Opening recent routes and trips, and managing saved items
- Importing GPX files or Google Maps links
- Opening Settings, Help, and the quick tour
If you are signed in, the breadcrumb bar at the top of the screen is the quickest way to open the Route Manager — click any folder there to open it for that folder. You can also open it from the main menu. The Route Manager opens full screen; use the link at the top of the folder list to go back to your route.
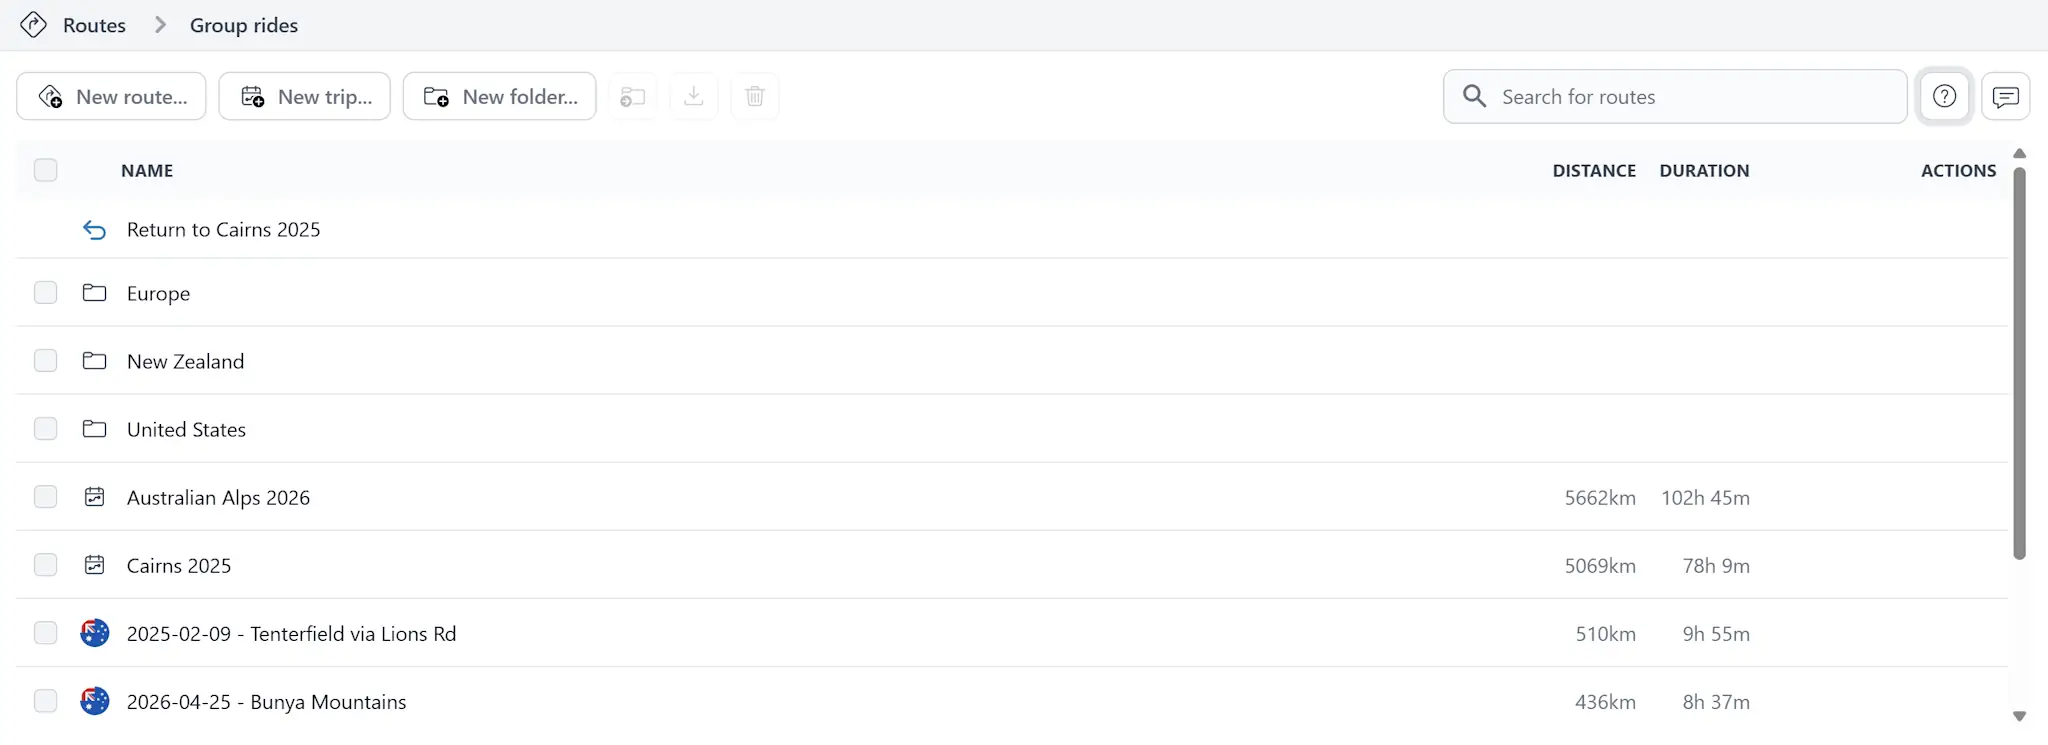
The Route Manager lets you work with your saved routes, trips, and folders. You can search for routes and trips by name, move them between folders, rename them, delete them, share them, and open them.
Exporting to GPX
To export a GPX file for the current route, open the route actions menu and choose Export to GPX.... To export the whole current trip, open the trip actions menu and choose Export trip to GPX.... To export one trip day, open that day's action menu and choose Export day to GPX....
- Basic export is available to all users.
- Advanced export is available to Premium users.
Advanced export can create GPX files for route-only, track-only, or combined route-and-track export, with options for route precision. This makes it suitable for direct import into compatible Garmin devices as well as other GPX-compatible software and devices.
Favorite places
Save locations you care about — hotels, fuel stops, scenic viewpoints — as favorite places. Favorites appear as orange markers on the map when the Favorites category is active in the POI panel.
Add favorites from the map popup, from a waypoint context menu, from POI search results, or by importing a file. Manage your full collection from the Favorites Manager, where you can search, filter by tag or icon, edit, export, and delete in bulk.
For full details, see Favorite Places and Favorites Manager.
More help
- Connect Claude or ChatGPT
- Waypoints and Route Editing
- Trips
- Menus and Document Actions
- Map Controls
- Saved Routes, Trips, and Route Manager
- Favorite Places
- Favorites Manager
- Importing from GPX
- Exporting to GPX
- Diagnostic Data & Error Reports
Contact
For suggestions, or to report problems, please email support@waypoint.guru.
WaypointGuru Terms and Conditions
WaypointGuru Privacy Policy
Credits
google-maps-data-parameter-parser (Copyright © 2016 David Edgar) is used according to terms of the MIT License
FileSaver.js (Copyright © 2016 Eli Grey) is used according to terms of the MIT License
LZMA-JS (Copyright © 2016 Nathan Rugg) is used according to terms of the MIT License